Link Your Account & Add the Indicators
Link your TradingView username to your mrD profile, then add the invite-only studies from TradingView — Indicators → Invite-only — and star them as favourites so they load in one click on every chart.
The mrD studies are published as invite-only Pine scripts. TradingView treats them like any premium subscription script — the studies only become visible once your TradingView account is on our access list. There are two halves to that link:
- Your side — you tell mrD-Indicators which TradingView username to grant access to. This is a profile field you fill once.
- Our side — once your subscription is verified, the distribution job pushes your TradingView username onto the access list of each study. Studies appear under Indicators → Invite-only scripts in TradingView.
You only do step 1 once per TradingView account. After that, every new study we publish reaches you automatically the moment your plan unlocks it.
1. Add your TradingView username to your mrD profile
Open the Web App profile page → click Edit Profile in the top-right of the bio card. The TRADINGVIEW NAME field is the one that matters here.
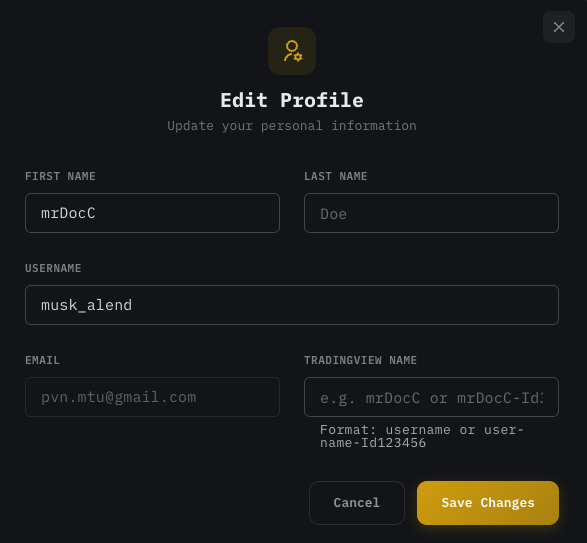 Edit Profile dialog. Paste the exact case-sensitive TradingView handle into the TRADINGVIEW NAME field.
The field accepts two formats:
- Bare username —
mrDocC. Use this if your TradingView username is unique and easy to find. - Long-form —
mrDocC-Id123456. Use this if your username is common; the numeric ID disambiguates it. You can copy this long-form string from TradingView → click your profile picture → Account & Billing.
The format hint under the field (Format: username or username-Id123456) is also live validation — if you type something that does not parse, the field will reject Save Changes.
Three things to double-check before saving:
- Case-sensitive —
MrDocCis not the same TradingView account asmrDocC. Copy-paste from your TradingView profile to be safe. - No leading
@— paste the username, not the at-mention. - It is YOUR TradingView account — not the trader you follow, not your team-mate. Access is bound to whatever account you put here; you cannot share a single mrD subscription across two TradingView accounts.
Click Save Changes. The next time the distribution job runs (typically every few minutes), your TradingView account gets added to each study's access list.
2. Open a chart on TradingView
Once the link is in, open any chart on TradingView — the Chart entry in the top navigation.
 Top-nav → Chart. Any symbol is fine — the studies are universal across crypto, FX, and equities.
3. Add the studies — Indicators → Invite-only
In the chart's top toolbar, click Indicators (or press the / shortcut). The dialog opens with the categories rail on the left. Scroll to and click Invite-only.
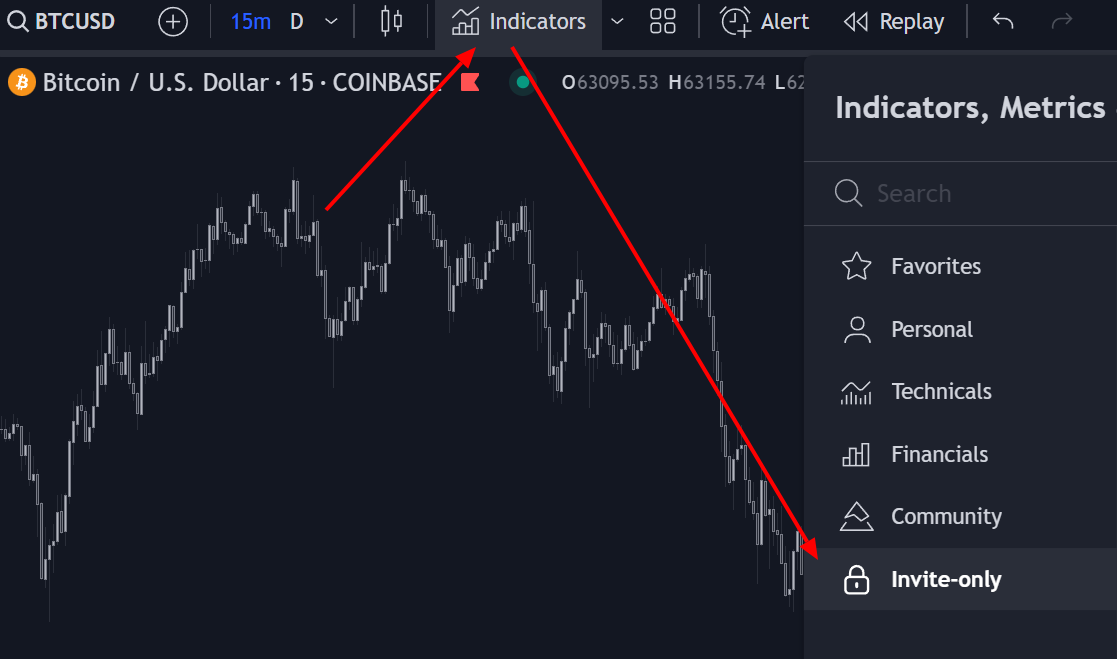 Indicators → Invite-only. Every study you have access to appears in this folder. Click any to drop it on the chart.
You should see the mrD studies listed — Signals Premium, Smart Ranges, RSI Premium, Open Interest, mrDAlgo — depending on the plan tier you are on. Single-click a study to add it to the active chart.
If the Invite-only folder is empty, or the studies appear with a red lock icon next to them:
- First, refresh the browser tab. TradingView caches the script list aggressively; a refresh forces it to re-pull your access list.
- Confirm your subscription is active. Open your Profile → Billings & Plans — if the plan shows expired or pending, the distribution job is holding access until renewal completes.
- Confirm the TRADINGVIEW NAME you saved matches the account you are logged into on TradingView. A typo or case mismatch in the profile field is the most common cause; the second-most-common is having two TradingView accounts and being logged into the wrong one.
If everything looks right and the studies still do not appear after a refresh + 5 minutes, ping support — we can manually trigger the access push from our side.
4. Star the studies as favourites
The Invite-only folder requires three clicks every time (Indicators → Invite-only → study). For studies you use on every chart, that overhead adds up. The fix is to star each study so it sits in the Favourites tab — one click from any chart's top toolbar.
In the Invite-only folder, hover a study row → click the ★ star icon at the right of the row to favourite it. Once starred, it shows up under Favourites in the same Indicators dialog, AND under the favourites tooltip on the top toolbar itself.
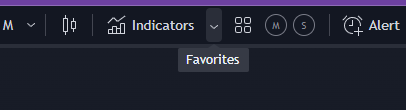 Favourites strip on the top toolbar. Click any favourited study to load it on the current chart without opening the Indicators dialog.
Starring is per-TradingView account, not per-chart — once you star a study, every chart you open already has it one click away.
What next
Now that the studies are on the chart, two follow-ups in order:
- TradingView workspace setup — strip the chrome, retune the six Chart Settings tabs, and lock the layout as a named preset so the workspace survives a fresh browser session.
- TradingView alerts — set push / email / webhook alerts on each study so signals reach you without you watching the chart.
- TradingView Indicators introduction — what each study does and how they fit together in a workflow.