Running Positions
Open trades the engine is actively managing. Live PnL, draggable SL and TP lines that update Binance orders in real time, AUTO vs Manual tagging, and the Whales / Alt Screener side panels for continuous market context.
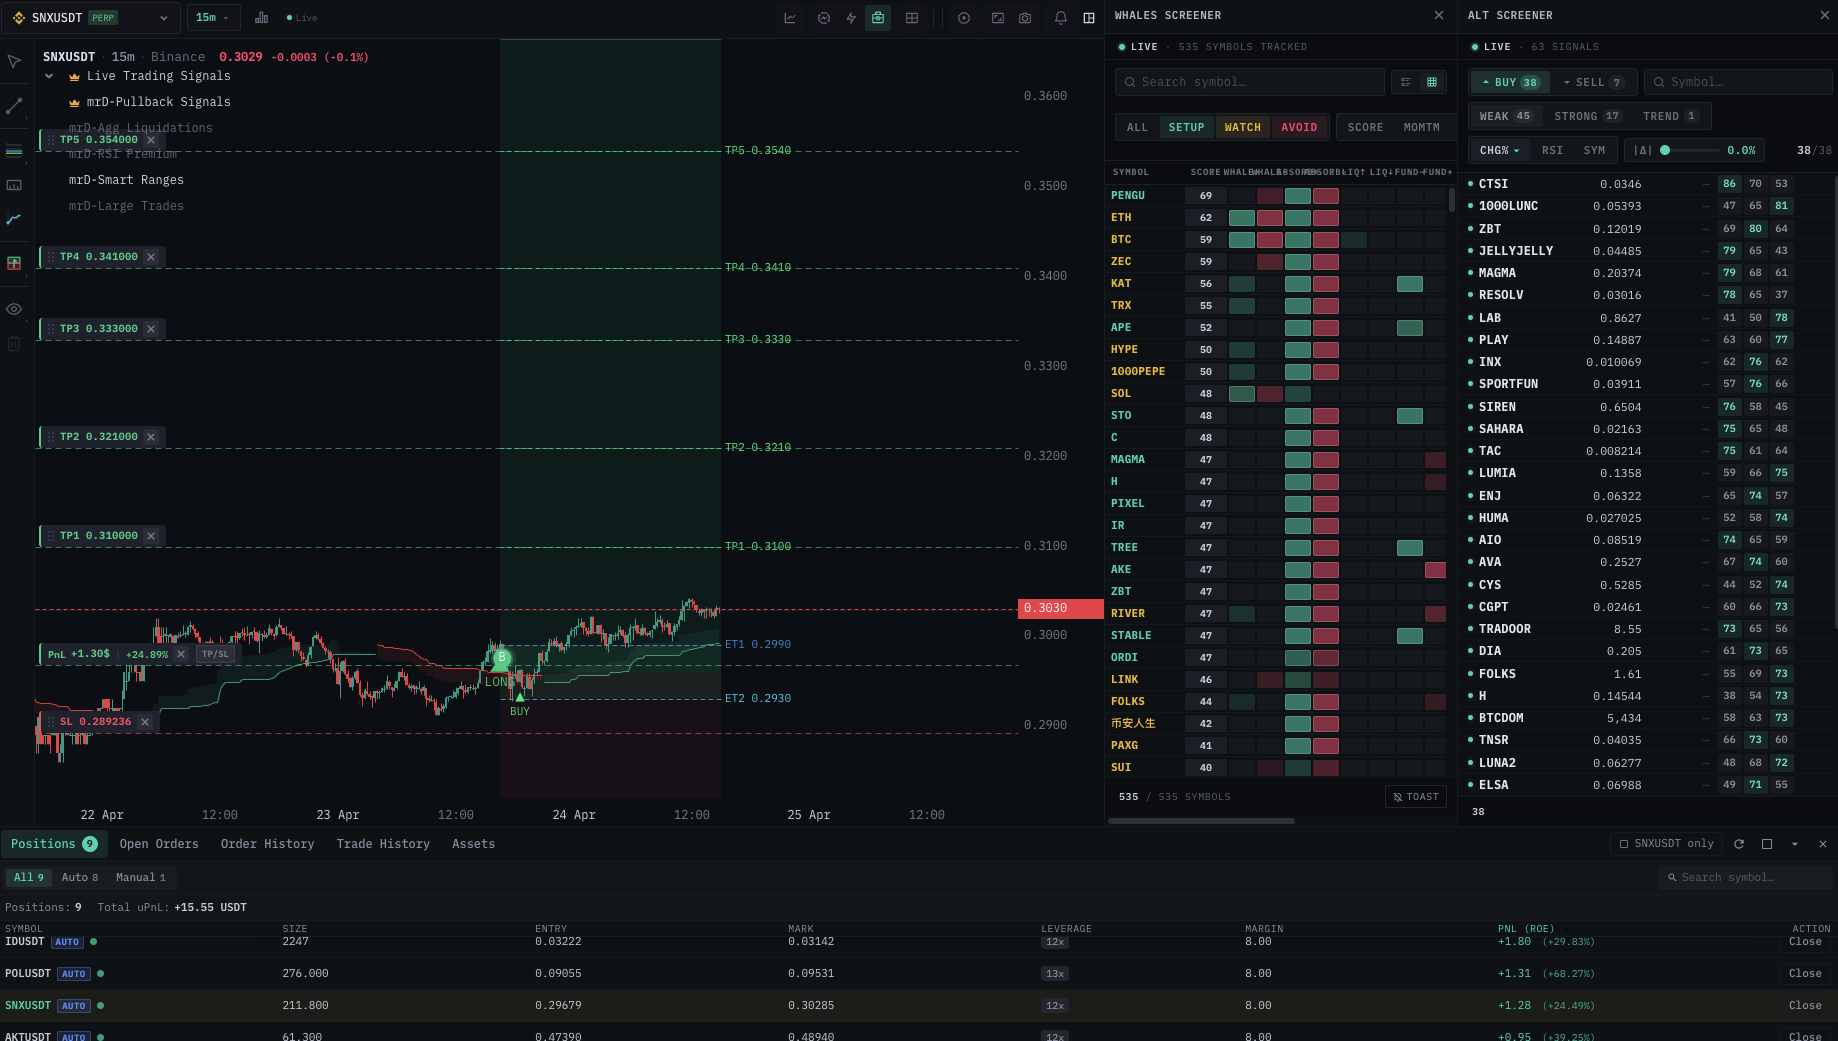
Running Positions is the live workbench for every trade the engine is currently managing. The Positions panel at the bottom of the chart terminal lists every open AUTO trade with its symbol, size, entry, leverage, mark price, and live PnL. The chart above it shows the SL and the six TP levels as draggable horizontal lines — move any line and the corresponding order on Binance updates immediately. The Whales Screener and Alt Screener panels on the right keep you informed about market conditions while you manage positions.
The Positions panel — what each row shows
| Column | Meaning |
|---|---|
| Symbol | Ticker (e.g. SNXUSDT). |
| AUTO / Manual badge | AUTO = opened by the signal engine. Manual = opened by you (or detached from auto management). |
| Size | Contract size of the position. |
| Entry | Average fill price across the entry orders. |
| Mark | Current Binance mark price. |
| Leverage | Live leverage on the position. |
| Margin | USDT margin allocated. |
| PnL (ROE) | Unrealized PnL in USDT and ROE %. Green when in profit, red when in loss. |
| Action | Close button — sends a market-close to Binance immediately. |
At the top of the panel:
- Total uPnL — aggregated unrealized PnL across all positions. The single most-checked number on the screen.
- Positions counter — how many concurrent trades are running.
- All / Auto / Manual filter — split AUTO from Manual rows. Use Auto when you want to see only what the engine is doing.
- Symbol search + <SYMBOL> only toggle — narrow the panel to one symbol (matches the chart you have open).
Draggable SL and TP lines
Every line on the chart — Entry, SL, TP1, TP2, TP3, TP4, TP5, TP6 — is draggable. The behaviour you get when you drag a line:
| Action on chart | What happens on Binance |
|---|---|
| Drag SL upward (long) | The stop order on Binance is amended to the new price. Updated immediately. |
| Drag SL downward (long) | Same — amend on Binance. Wider stop, more room for noise. |
| Drag any TP up or down | The corresponding TP order is amended on Binance. The volume allocation stays the same. |
| Drag Entry (on a pending limit entry) | The limit entry order is amended on Binance. |
There is no Save button, no confirm dialog for line drags — the update is sent the moment you release the mouse. This is intentional: trading is fast; multi-step confirms slow you down.
Practical: this is the most powerful tool the engine gives you. Once a trade hits TP1, drag SL up to breakeven. Once TP2 hits, drag it above entry. The worst case on the remaining size is then breakeven (modulo slippage and gap moves) — you've converted a paper gain into a locked outcome. The traders who profit consistently do this on every position.
SL / TP labels on the chart
Each line carries a label with the price and the volume allocation:
| Label example | Meaning |
|---|---|
Entry 0.3032 | Entry price. |
SL 0.289236 | Current stop-loss price. |
TP1 0.310000 × | TP1 price; the × button cancels just that TP without closing the position. |
TP6 0.354000 (with flag icon) | Final target — when this fills, the entire remaining position closes. |
A small profit chip floats near the entry line during the trade:
| Chip | Meaning |
|---|---|
PnL +1.30% (green) | Position is in profit by 1.30% of margin. |
+24.05% next to it | ROE — return on equity / margin. |
Filtering by AUTO vs Manual
The All / Auto / Manual tabs at the top of the panel split the rows by origin:
| Tab | Shows |
|---|---|
| All | Every open position regardless of origin. |
| Auto | Positions opened by the engine (still under SL / trailing management). |
| Manual | Positions you opened directly via Quick Trade OR detached AUTO positions. |
The badge on each row mirrors this — the small AUTO chip in green next to the symbol tells you the engine is still managing trailing SL on that row.
Closing a position
| Method | When to use |
|---|---|
| Hit Close in the panel row | Fastest path. Sends a market close to Binance immediately. |
| Drag SL onto the current price | Triggers the stop instantly. Same outcome, more deliberate. |
| Cancel an unfilled limit entry | Drag the entry line off-screen, or use the order-row close button in Open Orders. |
Every close routes through a confirmation dialog. See Confirmation dialogs for the exact wording and what the busy / error states mean.
Detaching from auto management
Sometimes you want to override the engine and keep a position open under your own management — for example, the trade is going so well you'd rather move TPs manually rather than let the trailing logic handle it. The action is Detach:
- The row's
AUTObadge becomesManual. - The engine stops sending any further amends (SL trail, TP cancels).
- All existing orders on Binance stay in place.
- You manage the trade by dragging lines yourself.
To detach: from the row's action menu → Detach from Auto. The dialog confirms; click through and the row converts.
Detached positions stay open until you close them — they do not auto-close when LIVE is turned off.
The two side panels
The chart-terminal side panels are designed to stay open alongside Running Positions:
Whales Screener (right)
- One row per symbol with a composite score.
- Tabs:
ALL/SETUP/WATCH/AVOID/ score / momentum. - Use it before approving a new signal AND while a position is running — the score updates in real time. A position whose symbol just went from SETUP to AVOID is worth a fresh chart look.
See Whales Screener.
Alt Screener (far right)
- Multi-timeframe RSI per symbol (15m / 1h / 4h).
- Filters:
CHG%/ RSI / SYM / all-direction. - Buy / Sell columns colour-code the lean of the symbol.
- Click any row to jump the chart to that symbol.
See Alt Screener.
The combination — chart + positions + Whales + Alt Screener on one screen — is the workspace mrD is built around. No tab-switching, no spreadsheet, no manual order editing on Binance.
Mobile
The same panel is available on the mobile chart terminal in a compact layout. TP/SL lines are touch-draggable — swipe to adjust levels, tap to close. See Mobile chart terminal.
Common pitfalls
- Forgetting to drag SL to breakeven after TP1 — the single most-costly oversight in active Full-Auto management. Build the habit: every morning, scan Running Positions, move SL on any trade that has hit TP1.
- Detaching then walking away — once detached, the engine no longer trails. If you forget, a winning trade can give back all its gains.
- Dragging SL while in a busy market — a sloppy mouse drag can move SL hundreds of dollars. Use the zoom (mouse wheel) first to get precise pixel resolution.
- Closing only via Binance — the panel will eventually catch up, but for a few seconds the engine still thinks the position is open. Close via the panel for instant consistency.
- Confusing AUTO and Manual after a Detach — the badge changes; double-check before trusting that the engine will trail SL on a row.
What's next
- History — review closed trades after they finish.
- Tips for profitable auto trading — the SL-management habits that turn the engine from neutral to profitable.
- Confirmation dialogs — what each Close prompt is asking.
- Bottom panel — Positions — the account-wide positions view that mirrors this panel.