Imbalance Concept
The Fair Value Gap engine inside mrD-Smart Ranges — auto-detects three-candle imbalance patterns where price moved too fast to leave a complete order trail, then fires the small dot-prefixed BUY / SELL arrow when a matured FVG is retested. Full settings reference for FVG Filters, FVG Signals, Mitigation Type, High Timeframe and the FVG Extend maturity threshold.
The Imbalance Concept module is the Fair Value Gap (FVG) engine of mrD-Smart Ranges. It scans every three-candle window for the classic ICT-style imbalance pattern — where the wick of candle 1 and the wick of candle 3 do not overlap, leaving an unfilled price strip across candle 2. Those gaps are zones the market "owes" itself, and price has a strong statistical tendency to revisit them. When a matured FVG is retested the module fires a small •BUY / •SELL arrow that pairs naturally with the larger Order Block triangle.
Use this module as a confluence layer on top of Order Blocks, not as a primary entry on its own. The strongest setups are when an FVG sits inside an Order Block — those zones combine institutional positioning (the OB) with unfilled price (the FVG), and the retest is the highest-conviction entry the study produces.
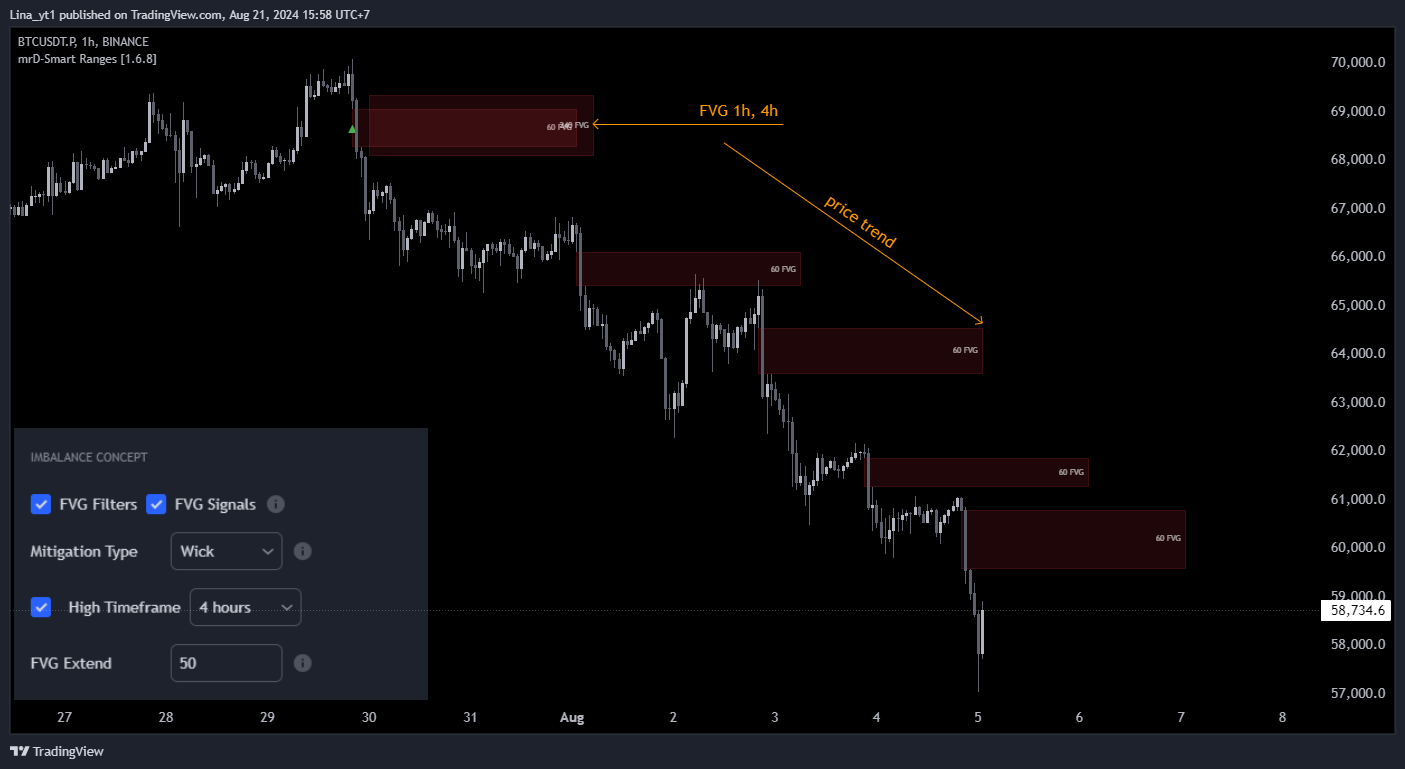 FVGs are the shaded rectangles painted across the candle that left the imbalance. Cyan = bullish FVG (price will tend to revisit from above); red = bearish FVG (from below). The
 •BUY / •SELL arrow is the FVG Signal and only fires once the FVG has matured.
What an FVG is
A Fair Value Gap is the simplest imbalance pattern in price action. Take three consecutive candles:
- Bullish FVG — candle 1's high is below candle 3's low. The price strip between those two values was never traded; candle 2 jumped across it. The gap is treated as a demand zone.
- Bearish FVG — candle 1's low is above candle 3's high. Mirror of the above; the gap is a supply zone.
The intuition: when price moves that fast, one side of the order book was effectively skipped. The market has not "agreed on a price" inside that strip, and there is a strong tendency for price to come back and fill it before continuing. FVGs are therefore both magnets (price wants to retrace into them) and reaction zones (when price does retest, it often reverses there).
The module flags FVGs as they form and fires the •BUY / •SELL arrow on retest — provided the FVG has had time to mature (see FVG Extend below).
Settings reference
| Setting | Default | What it controls |
|---|---|---|
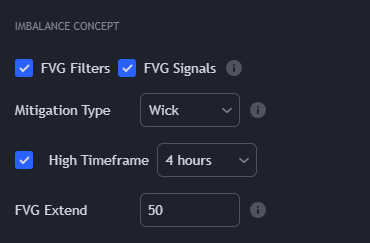
| FVG Filters | On | Master toggle for FVG rendering. Required for FVG Signals to work. |
| FVG Signals | On | Master toggle for the •BUY / •SELL retest arrows. Requires FVG Filters to also be ON. |
| Mitigation Type | Wick | How the engine considers an FVG "filled" (= consumed / invalidated). Two modes: Wick / Close. See Mitigation Type below. |
| High Timeframe | Off | Tells the engine to also pull FVGs from a higher timeframe and render them on the chart. Useful for confluence reads. |
| FVG Extend | 50 | Number of bars an FVG must survive before it can generate a retest signal. Higher = fewer but more reliable signals. See FVG Extend below. |
The FVG Filters / FVG Signals dependency
This is the single most-common configuration mistake in this module. Both toggles must be ON to receive signals:
| FVG Filters | FVG Signals | Result |
|---|---|---|
| Off | Off | No FVG zones, no signals. |
| On | Off | FVG zones rendered, no •BUY / •SELL arrows. Useful for visual reads only. |
| Off | On | Nothing — Signals depend on Filters. Common mistake — looks broken but is misconfigured. |
| On | On | Full module — zones rendered AND signals fire on retest. |
If you have alerts wired and they are silent, this dependency is the first place to check. See Alerts — FVG dependency.
Mitigation Type
This controls when an FVG is considered filled and removed from the chart. Only two modes here (vs three for OBs):
| Mode | Rule | Effect |
|---|---|---|
| Wick (recommended) | FVG is filled only when a candle's wick fully reaches the far edge of the gap. | Conservative — FVG stays live until price truly comes back to the full extent of the imbalance. |
| Close | FVG is filled when a candle closes anywhere inside the gap. | Aggressive — FVG is removed at first close-touch. Fewer retests, cleaner chart. |
The recommended default is Wick — it matches how most SMC traders read FVGs (the gap is filled when price has revisited the entire strip). Close is appropriate for traders who want a cleaner chart and accept that some valid second-touches will be missed.
High Timeframe
When ON, the engine also pulls FVGs from the chosen higher timeframe and renders them on top of the chart-TF FVGs. The HTF FVGs are much larger and represent more important imbalances. Use them as structural targets — price often runs to fill an HTF FVG before reversing.
The recommended pairing is one step up from chart TF, identical to the OB confluence rule:
| Chart TF | Recommended HTF |
|---|---|
| 5m | 15m |
| 15m | 1H |
| 1H | 4H |
| 4H | 1D |
FVG Extend — the maturity threshold
FVG Extend is the most consequential setting in the module after Mitigation Type. It defines how many bars an FVG must survive before it can fire a retest signal.
| Value | Behaviour | When to use |
|---|---|---|
10–20 | Aggressive — FVG can fire signals shortly after it forms. | Scalping; you want as many signals as possible and you accept more false positives. |
50 (default) | Balanced — FVG must hold for ~50 bars to be considered "real" structural imbalance. | The general-purpose default; recommended for 15m–4H. |
100+ | Strict — only deep-held FVGs fire signals. | Position trading; you only want the highest-conviction setups. |
The intuition: a fresh FVG that gets created and immediately tested is often just intra-bar noise. A FVG that has survived 50 bars unfilled is a real imbalance the market has been respecting — those produce reliable reactions when finally tested.
The setting also controls the rendered length of the FVG rectangle (the gap "extends" to the right for this many bars). So higher values also produce wider zones on the chart — which makes them easier to spot but takes more screen real-estate.
Trading playbook
The canonical FVG trade in this study:
- Find the FVG-inside-OB setup. Scroll your chart with both
Order BlocksandFVG FiltersON. Look for an FVG that sits inside an Order Block — those zones combine institutional positioning with unfilled price. - Confirm HTF agreement. Switch HTF on briefly to check if the FVG / OB confluence is also visible at the higher timeframe. If yes, the setup graduates from "good" to "high-conviction".
- Wait for the
•BUY/•SELLarrow. Do not pre-empt the signal — the FVG Extend threshold exists for a reason. The arrow confirms the FVG has matured and price is now retesting it. - Entry on signal close, stop just past the FVG. A clean FVG signal has its stop at the far edge of the gap; if price closes through that, the imbalance is filled and the trade thesis is gone.
The FVG signal works best as a confluence layer. Pure FVG-only trades (no OB, no liquidity context) produce moderate hit rates but are not what this module was designed for.
Tips for cleaner reads
- Always check FVG Extend first if alerts feel too frequent or too rare. It is the volume knob for the entire module.
- Keep HTF off on lower-TF charts. On 5m, an H1 FVG will dominate the screen. Use HTF only at 15m+ where the higher-TF FVG is sized reasonably.
- Hide the FVG rectangles in screenshots / shared analysis but leave them on while trading. They are visually busy but informationally dense — the rectangles are the playbook.
- An FVG that fills on the same bar it forms is not real. The engine still draws it briefly; ignore it. Real FVGs survive
FVG Extendbars.
Common mistakes
- Turning on
FVG SignalswithoutFVG Filters. Nothing fires. Both toggles required — see the dependency table above. - Trading FVG signals in isolation. The FVG arrow is a confluence tool, not a standalone signal. Pair it with an OB or a liquidity sweep.
- Lowering FVG Extend to get more signals. This is the wrong fix for "few signals" — usually means the symbol / TF is just quiet. Lower FVG Extend produces noisier signals, not better ones.
- Confusing FVG Mitigation Type modes between this module and Order Blocks. OBs have three modes (Wick / Close / Average), FVGs have two (Wick / Close). Don't assume they behave identically.
- Setting Mitigation Type to
Closeon a high-volatility instrument. A single news candle closes through every FVG on screen and wipes them all out.Wickis safer.
Common questions
Why don't I see FVGs on this chart? Either (a) FVG Filters is OFF, (b) the timeframe is too low and the engine considers them all unmatured under FVG Extend, or (c) the symbol simply hasn't produced any three-candle imbalance windows recently. Try 15m or 1H on a liquid major to confirm the module is working.
Why did an FVG signal fire on a zone that has been on screen for ages? That is exactly when the FVG signal is supposed to fire — after FVG Extend bars of maturity. The intuition is that the longer the FVG holds, the more institutional respect it has, and the more reliable the retest.
What's the difference between an FVG and an OB? OB = the candle before the move (institutional positioning); FVG = the gap inside the move (skipped price). They often appear at the same place — that is the confluence setup the study is built around.
Does the FVG Signal repaint? No. The •BUY / •SELL arrow confirms on bar close. The FVG itself is confirmed once the three-candle pattern completes; nothing moves backwards.
Where to go next
- The Order Block module FVGs are usually combined with: Order Blocks.
- The liquidity layer that explains the sweep just before an FVG retest: Liquidity Concept.
- Wire the
•BUY/•SELLarrow into push / webhook delivery: Alerts. - Back to the study overview: mrD-Smart Ranges.