Trade Config — defaults, entry, TPs, trailing
The full reference for the Trade Config tab — execution mode, volume per trade, leverage override, entry strategy (Two Limits vs. Market + Two Limits), the six-level TP ladder, trailing TP and trailing SL. Configure once, applies to every new signal.
The Trade Config tab is the heart of Auto Trade. Everything below the top row of cards configures how the engine handles a signal once it has been accepted: how much capital to allocate, what leverage to use, how to enter the position, where the six take-profit levels sit, and how the SL trails up as the trade matures. Save once, and the new config applies to every new signal going forward — existing positions keep the config they opened under.
Sections on this page mirror the on-screen card order:
- Execution Mode (Semi-Auto / Full-Auto + AI Agent)
- Trade Defaults (volume, leverage override, position mode)
- Entry Strategy
- Take-Profit Targets
- Trailing Take-Profit
- Trailing Stop-Loss
- Preview Config
- Save & Reset
- Beginner preset
The Signal Source, AI Agent, and global Filters cards are documented separately on Signal source & filters — read that page first.
1. Execution Mode
The most important choice on the page. Two modes:
Semi-Auto
- Every accepted signal lands in the Signal Live Monitor as a pending card.
- You review the chart context and click Approve or Reject on each.
- The engine places nothing until you approve.
- Best for — your first 50–100 trades on a new config, anyone who wants full control over each fill.
Full-Auto
- Signals are filtered, sized, and fired immediately. No approval step.
- Switching to Full-Auto opens a risk-warning dialog with a confirmation checkbox you must tick. See Confirmation dialogs.
- Best for — after you have validated your config in Semi-Auto for at least a week and trust the signal source.
Tip: start with Semi-Auto for at least 1–2 weeks to learn how the signals perform under your config. Switch to Full-Auto only when you have a baseline you trust.
2. Trade Defaults
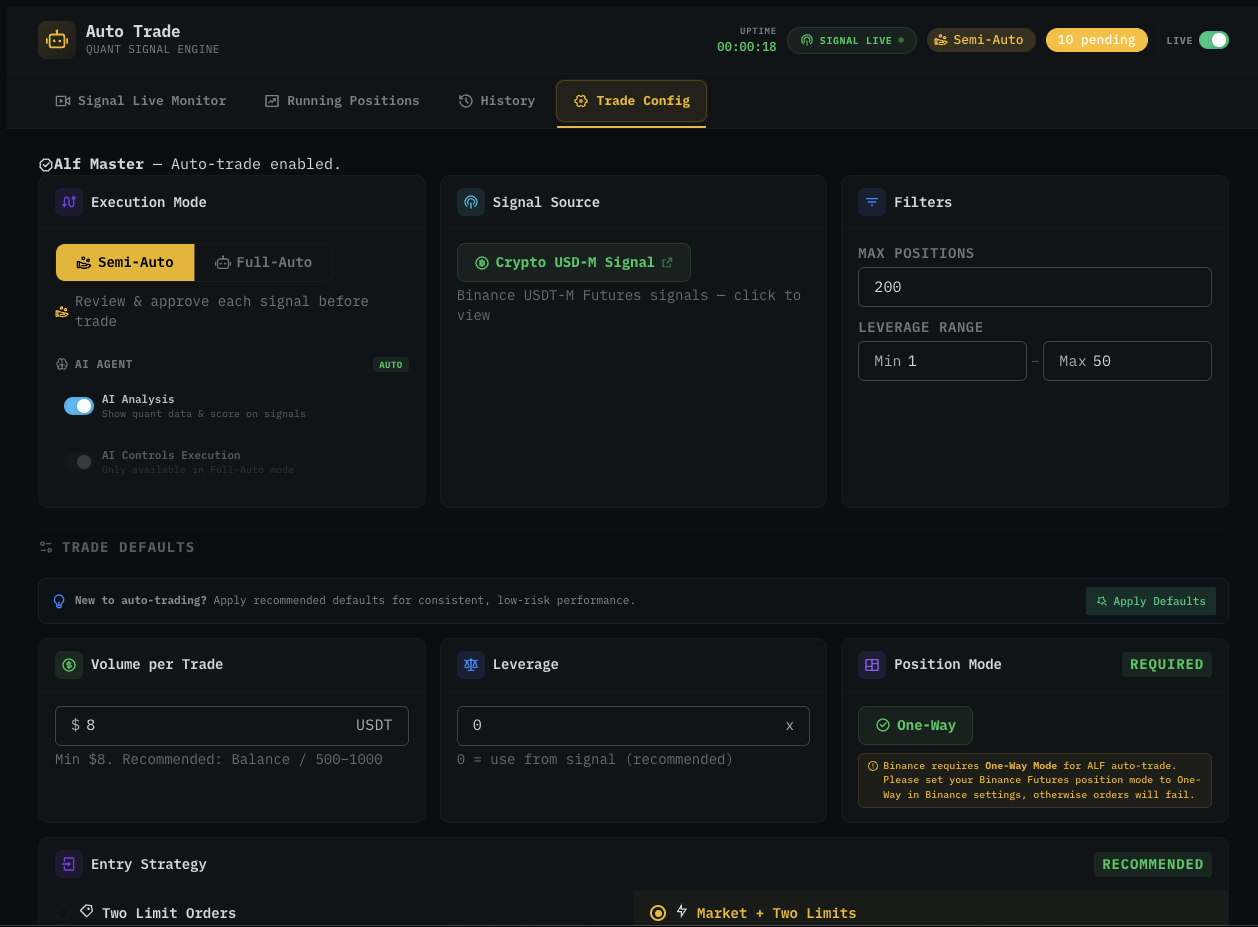
Volume per Trade
USDT amount allocated to each accepted signal.
| Setting | Value |
|---|---|
| Minimum | $8 USDT |
| Recommended formula | Balance ÷ 500 to 1000 |
| Example — $1,000 balance | $1 — $2 per trade |
| Example — $5,000 balance | $5 — $10 per trade |
| Example — $20,000 balance | $20 — $40 per trade |
Setting volume too high relative to balance is the #1 reason new Auto Trade users blow up their accounts. The recommended formula keeps total risk across Max Positions at a level you can absorb during a losing streak.
Leverage Override
| Value | Behaviour |
|---|---|
| 0 (default, recommended) | Each trade uses the leverage the signal recommends. |
| Any positive number | All trades use that fixed leverage, regardless of signal. |
Leverage override is useful when you want to dial down the engine's leverage uniformly. Setting it to 10× means every signal fires at 10× — a 50× signal becomes 10×, a 5× signal also becomes 10×.
Leverage override is independent of the Max Leverage filter on the Filters card. The filter decides which signals are accepted; the override decides what leverage is used after acceptance. To filter aggressive signals out entirely, lower Max Leverage instead of relying on override.
Position Mode
Fixed at One-Way. You cannot change this in the config — and you must also have your Binance Futures account set to One-Way Mode. See Hedge mode notes for the why and the switching workflow.
3. Entry Strategy
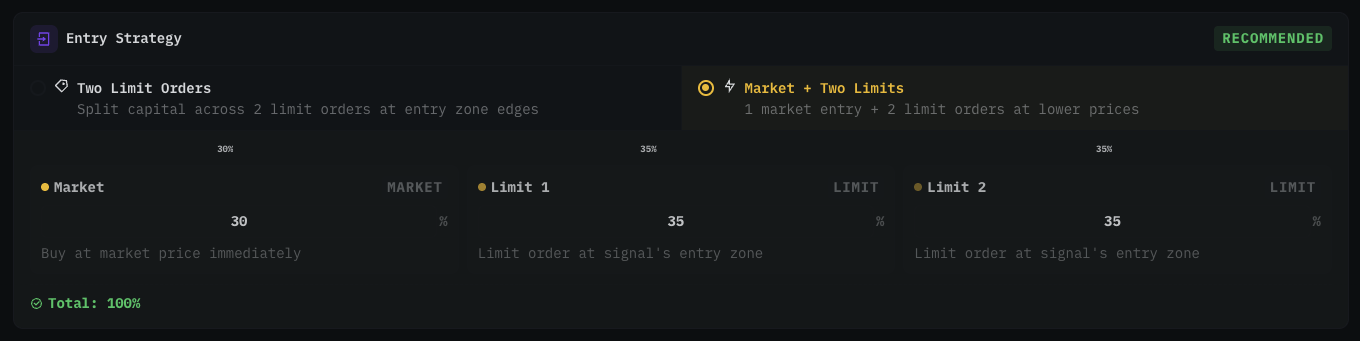
Two strategies; pick one.
Option A — Two Limit Orders
- Capital is split across 2 limit orders placed at the edges of the signal's entry zone.
- Default split: 50% / 50%.
- Pros — better average entry price, lower fees (maker only).
- Cons — orders may not fill if price never reaches the limit levels. Signal can complete without you being in it.
Option B — Market + Two Limits ⭐ recommended
- 1 market order executes immediately at signal time, plus 2 limit orders at lower prices to add to the position if the market gives a better price.
- Default split: 30% market / 35% limit 1 / 35% limit 2.
- Pros — guaranteed initial position via market, plus DCA if price dips further.
- Cons — market portion pays taker fees.
Tuning the split
Edit the percentage values directly in the input fields. The colored allocation bar above updates in real time as you type.
| Constraint | Notes |
|---|---|
| Total must equal 100% | If not, Save is disabled and a red warning appears. |
| Each input | 0–100. The bar shows relative weights. |
Common variants:
| Strategy | Market | Limit 1 | Limit 2 |
|---|---|---|---|
| Default (balanced) | 30% | 35% | 35% |
| Aggressive entry | 50% | 25% | 25% |
| Maker-leaning | 10% | 45% | 45% |
| Single market | 100% | 0% | 0% |
4. Take-Profit Targets
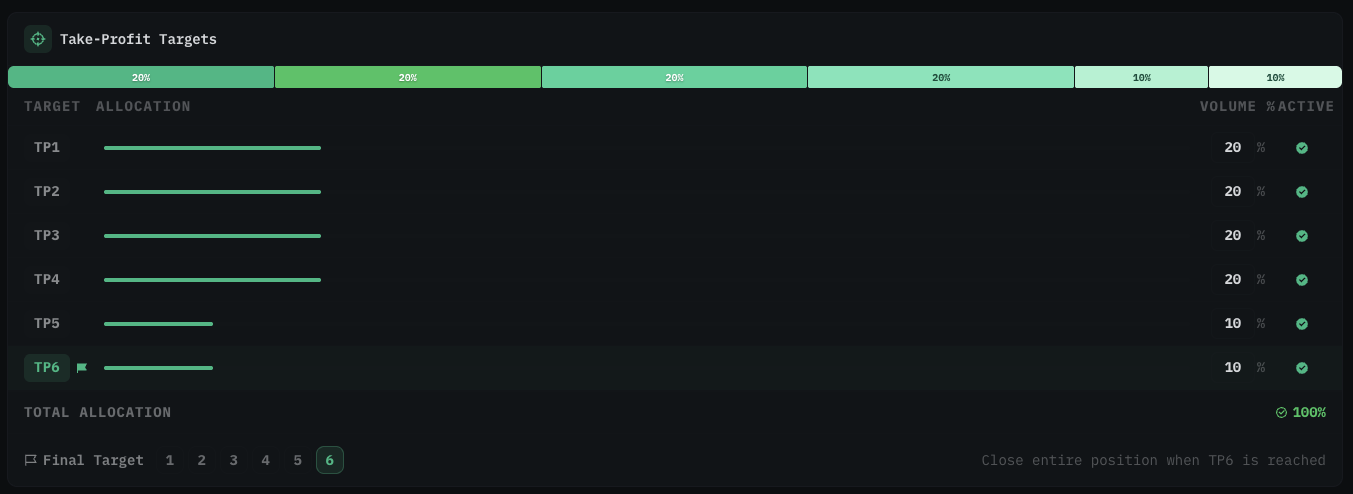
The engine supports up to six TP levels (TP1 → TP6). Each level has four fields:
| Column | Meaning |
|---|---|
| Target | Level name (TP1, TP2, … TP6). |
| Allocation | Visual bar showing the relative percentage. |
| Volume % | Percentage of the position that closes when this level is hit. |
| Active | Toggle to enable/disable this TP level. |
TP mode — Signal vs. Custom
In the top-right of the card header, a Signal / Custom toggle:
- Signal — uses TP prices the signal hub publishes (server-calculated based on structure).
- Custom — you define your own TP prices. Advanced. Most users keep this on Signal.
Volume allocation
Total Volume % across all active TPs must equal 100%. Default split:
| TP | Volume % |
|---|---|
| TP1 | 20% |
| TP2 | 20% |
| TP3 | 20% |
| TP4 | 20% |
| TP5 | 10% |
| TP6 | 10% |
| Total | 100% |
Front-loading TP1/TP2 (e.g. 30% / 30% / 20% / 10% / 5% / 5%) takes profit earlier and is friendlier to ranging markets. Back-loading (10% / 10% / 15% / 20% / 20% / 25%) catches bigger moves but more trades round-trip without finishing.
If the total ≠ 100%, a red warning appears and Save is disabled.
Final Target
A dropdown 1–6 picks which TP is the final level. When this level is reached, the entire remaining position closes.
| Final Target | Effect |
|---|---|
| TP6 (default) | Let the signal run through all six levels. Best for trending markets. |
| TP3 / TP4 | Close earlier, take profit sooner. Better in ranging / sideways conditions. |
| TP1 / TP2 | Very conservative — most of the move is given back. |
5. Trailing Take-Profit
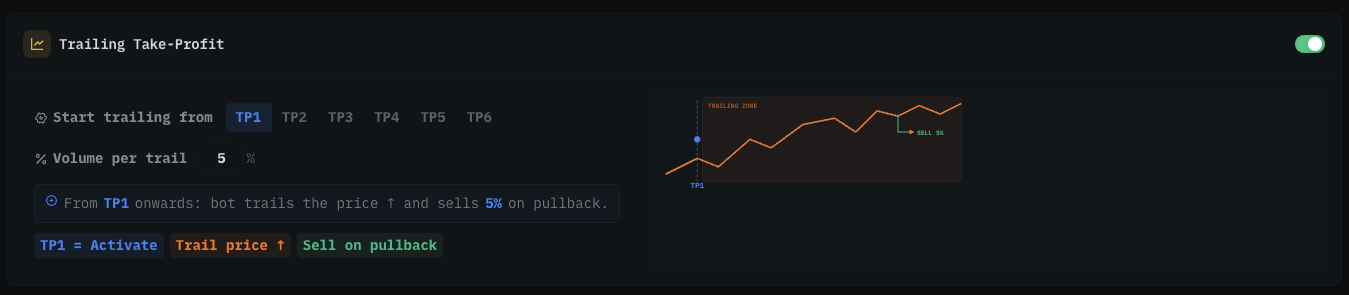
When enabled, the engine stops placing a fixed TP order at the activation level. Instead, it trails the price upward and sells a portion of the position on each pullback.
How it works
- Price reaches the TP level you choose (e.g. TP2) → trailing activates.
- The engine follows price as it moves further in your favour.
- When price pulls back from the new peak → a portion of the position is sold at market.
Settings
| Setting | Meaning |
|---|---|
| Start trailing from | The TP level that activates trailing. TP1–TP6. |
| Volume per trail | Percentage of the position sold on each pullback. Default 5–20%. |
Disabled vs. enabled
| Mode | Behaviour |
|---|---|
| Disabled | TP orders are placed at the exact published TP prices — they fill at that level, nothing more. |
| Enabled | Past the activation TP, the engine captures extra profit when trends extend. |
Trade-off: trailing TP maximises profit in strong trends. In choppy / sideways markets, it can miss TPs because price reverses too early. For beginners, keep it ON and set activation at TP2.
6. Trailing Stop-Loss
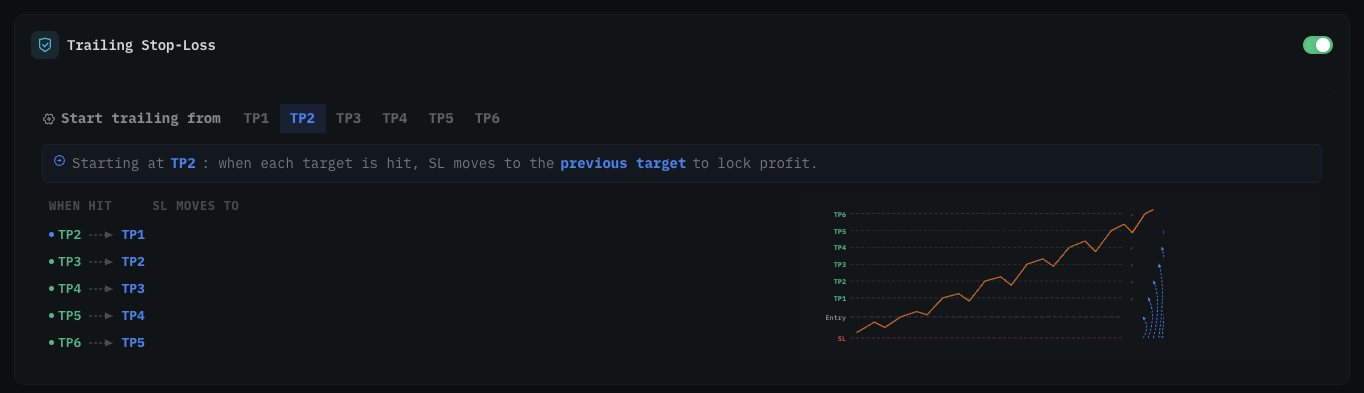
When enabled, every time a TP level is hit, the stop-loss automatically moves up to the previous TP to lock in profit.
Example — activate from TP2
| When price hits | SL moves to |
|---|---|
| TP2 | Entry (breakeven) |
| TP3 | TP2 |
| TP4 | TP3 |
| TP5 | TP4 |
| TP6 | TP5 |
Settings
| Setting | Meaning |
|---|---|
| Start trailing from | The TP level that triggers trailing SL. E.g. TP2 = once TP2 is hit, SL moves to Entry. |
Disabled vs. enabled
| Mode | Behaviour |
|---|---|
| Disabled | SL stays at the original signal SL. If price reverses hard after a partial TP fill, you take the full loss on remaining size. |
| Enabled | After the activation TP fills, the worst-case outcome on the remaining size is breakeven (or better). |
Always keep Trailing SL enabled. This is the single most important safety feature. It ensures that once a few TPs have filled, you never lose money on that trade. Worst case = breakeven on the remaining size.
7. Preview Config
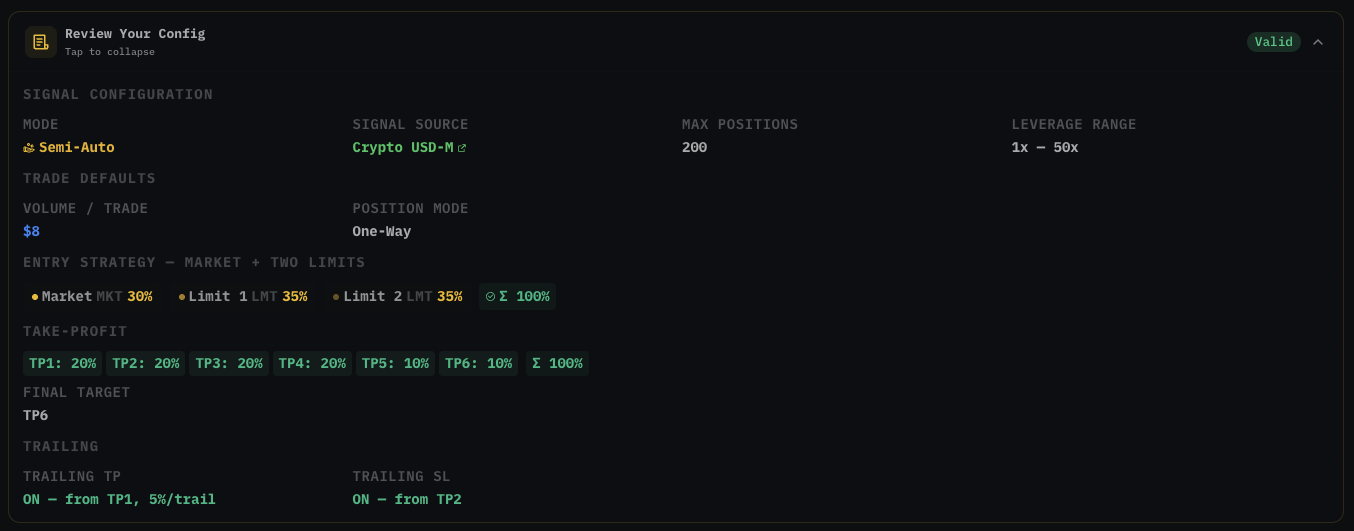
At the bottom of the page, a collapsible Preview Config section summarises the entire configuration:
- Mode, Signal Source, Max Positions, Leverage Range
- Volume, Position Mode
- Entry Strategy + split
- Take-Profit allocation per level + Final Target
- Trailing TP status (ON / OFF + activation + volume/trail)
- Trailing SL status (ON / OFF + activation)
The chip in the corner shows:
| Chip | Meaning |
|---|---|
| Valid (green) | All totals add to 100%, no constraint violations. Safe to save. |
| Issues (yellow) | Something is off — TP total ≠ 100%, Entry split ≠ 100%, or another constraint. Fix before saving. |
Always open the Preview and read it through before clicking Save. Catching a misconfiguration here is free; catching it after Full-Auto fires 10 trades is not.
8. Save & Reset
| Button | Action |
|---|---|
| Save Config | Persists the entire configuration to the server. The new config applies to the next incoming signal. |
| Reset All | Reverts every field to factory defaults. Nothing is saved until you click Save. |
| Apply Defaults | Auto-fills the beginner recommended preset (see below). |
Save is disabled when:
- TP allocation total ≠ 100%.
- Entry Split total ≠ 100%.
- A save is already in flight (loading state).
Important: Config changes only affect new signals. Open positions keep their original SL/TP/trailing settings from when they were created. If you want a position to use the new config, close it and let the next signal re-open under the new rules.
9. Beginner preset (Apply Defaults)
Clicking Apply Defaults fills the form with the recommended starting config:
| Setting | Value |
|---|---|
| Mode | Semi-Auto |
| AI Analysis | ON (informational) |
| AI Controls Execution | OFF |
| Max Positions | 5 |
| Leverage Range | 1× — 20× |
| Volume per Trade | $8 (adjust to your balance) |
| Leverage Override | 0 (follow signal) |
| Entry Strategy | Market + Two Limits (30 / 35 / 35) |
| TP Allocation | 20 / 20 / 20 / 20 / 10 / 10 |
| Final Target | TP6 |
| Trailing TP | ON, from TP2, 20% per trail |
| Trailing SL | ON, from TP2 |
After applying, adjust Volume per Trade to match your account size, glance at the Preview, then click Save Config.
Common pitfalls
| Symptom | Cause | Fix |
|---|---|---|
| Save button greyed out | TP% or Entry% ≠ 100. | Adjust until total is exactly 100. |
| Bot not placing orders | LIVE switch is OFF, or signal hub is OFFLINE. | Toggle LIVE on; check the status pill on the top bar. |
Order rejected with POSITION_SIDE_NOT_MATCH | Binance is in Hedge Mode. | Switch your Binance account to One-Way Mode. See Hedge mode. |
| Signals skipped repeatedly | Max Positions reached, or leverage out of range, or AI score below threshold. | Check the Signal Live Monitor Skipped filter for the reason. Adjust filters or AI threshold. |
| Insufficient margin errors | Volume per trade × Max Positions exceeds available margin during a busy market hour. | Lower Volume per Trade or Max Positions. |
| Trailing TP missing the move | Volume per trail is too aggressive — selling too much on small pullbacks. | Lower volume per trail (5% is a good starting point). |
| Trailing SL stops you out before TPs | Activation set too early (TP1 too tight). | Move activation to TP2 so the first TP has space to fill cleanly. |
What's next
- Signal Live Monitor — see incoming signals before they fire (Semi-Auto) or watch them execute (Full-Auto).
- Running Positions — manage open trades and drag SL/TP lines on the chart.
- Confirmation dialogs — what each destructive action asks before it commits.
- Tips for profitable auto trading — habits that protect your config from bad trades.