TradingView Alerts
Set up TradingView alerts on the mrD studies so signals reach your phone / email / webhook without you babysitting the chart — pick the right condition, set frequency, choose delivery, manage the alert quota.
A trader cannot watch every chart on every timeframe at once. Alerts are how you scale attention — you decide once what is worth knowing about (a Pullback Buy on BTCUSDT 1H, a Trend Change on ETHUSDT 4H, a Wave Sell on any symbol crossing a specific level) and TradingView fires the notification on your phone, in your email, or to a webhook URL the moment the condition triggers.
This page covers the workflow specific to the mrD studies. For the underlying TradingView alert system in full depth, see the official references at the bottom of this page.
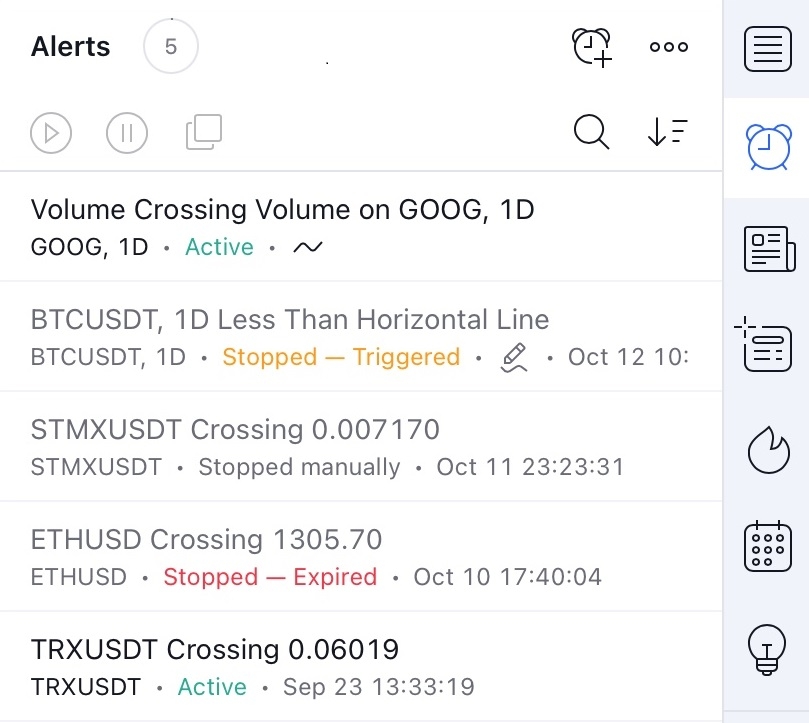 The Alerts panel (right-side toolbar → bell icon). Active = armed, Triggered = fired and stopped, Expired = passed its end date, Stopped manually = you paused it.
How TradingView alerts work — three knobs
Every alert is the combination of three settings. Get these three right and the rest is just naming.
- Condition — what has to happen for the alert to fire. For the mrD studies the condition is the study itself plus the specific signal flavour (BUY Pullback, SELL Wave, Trend Change, Divergence, etc.). TradingView exposes each study's alert-emitting condition under the study name in the condition dropdown.
- Frequency — how often the alert is allowed to refire. The two safe modes for indicator alerts are Once Per Bar Close (fires once at the close of the bar that triggered the condition; recommended for swing setups) and Once Per Minute (fires no more than once per minute; recommended for scalp alerts). Avoid Once Per Bar without "close" — it can fire mid-bar and reverse before the bar closes.
- Delivery — where the notification lands. Push to the TradingView mobile app, email, SMS (paid plans), or webhook (an HTTPS POST to any URL — this is what you wire up to a bot, a Discord channel, a Telegram channel, or your own server).
Set an alert on an mrD study
With the study on the chart (see Link your account & add the studies if not yet):
- Click the alarm-clock icon in the top toolbar (or press
Alt+Aon Windows,⌥+Aon macOS). The Create Alert dialog opens. - Condition — in the first dropdown, pick the mrD study by its full name (e.g.
mrDAlgo Premium). In the second dropdown, pick the specific event (e.g.BUY Pullback,Bullish Trend Change,ANY ALERT() FUNCTION CALL). The third row stays on the default operator unless you have a reason to change it. - Options → Trigger — choose
Once Per Bar Closefor swing / position trades,Once Per Minutefor scalp. Set an Expiration date if you want the alert to auto-disarm (otherwise it runs until you manually stop it or your alert quota cycles). - Notifications — tick the channels you want:
App(push to TradingView mobile),Email,Email-to-SMS(use your carrier's email-to-SMS gateway if you don't have a paid SMS plan),Webhook URL(paste the endpoint). - Alert name & Message — name it descriptively (
BTC 1H Pullback, notAlert 47). The Message body supports placeholders like{{ticker}},{{interval}},{{close}},{{plot_0}}— useful when piping to a webhook so the receiving service can parse symbol / price / etc. - Create.
Some mrD studies ship with pre-formatted alert messages that include the symbol, timeframe, price, RSI value, and a key level inline — these fire as ANY ALERT() FUNCTION CALL events. If the study you set is one of those, you do not need to write the message body yourself; the study does it for you.
Delivery channel cheat sheet
Pick one or stack two. Stacking three+ on the same alert clutters your phone without adding signal.
- App push — fastest, free on all TradingView plans, but only fires while the app is installed and you are logged in. The default for active traders.
- Email — universal, free, but adds 10-90 s latency depending on the mail provider's spam filter. Use as a backup channel, not the primary one for scalp signals.
- SMS — paid (Pro+ plan and above). High-priority alerts only — fire too often and you train yourself to ignore them.
- Webhook URL — the integration that scales. Pipe alerts to a Discord channel, a Telegram bot, a TradingView-to-broker bridge, or your own backtest logger. The receiving server gets the alert message body as the POST payload; format it with placeholders so the parsing is structured.
Manage the alert quota
TradingView caps the number of active alerts per account by plan tier (free, Essential, Plus, Premium, Pro+). When you hit the cap, new alerts refuse to create until you delete one or move it to Stopped state.
Practical hygiene that keeps the quota from biting:
- Use Expiration dates. An alert without an expiry hoards a quota slot forever. Default to 30 days for swing alerts; renew the ones that matter.
- One symbol, multiple conditions. Stacking 3 conditions on BTCUSDT in a single alert (using
ORlogic) costs one slot, not three. TradingView's Create Alert dialog has a+button to add conditions. - Stop, don't delete, recurring alerts. Stopped alerts keep their full configuration; you reactivate with a single click instead of rebuilding from scratch.
The Alerts panel (right-side toolbar → bell icon, shown in the screenshot above) lists every alert with its current status — Active (armed), Stopped — Triggered (fired and stopped), Stopped manually (you paused it), Stopped — Expired (passed its end date). Sort by date, search by symbol, and bulk-stop / bulk-delete from the three-dot menu at the top-right.
Further reading
The mrD studies use the standard TradingView alert mechanism — everything in the official TradingView docs applies as-is:
- About alerts — TradingView alerts — overview
- Strategy alerts — Strategy alerts (every event a strategy emits)
- Managing alerts — Create, edit, pause, copy, delete alerts in bulk
- Webhook setup — How to set up webhook URLs in alerts
Where to go next
- Link your account & add the studies — get the mrD studies on your chart before you can build alerts on them.
- TradingView workspace setup — strip the chrome and lock the layout as a preset.
- TradingView Indicators introduction — what each mrD study does and which alert events it emits.