Pullback Signals
The core entry engine of mrD-RSI Pullback — what triggers a Pullback Signal (3-condition rule), the philosophy of trading pullbacks over breakouts, settings reference, four built-in filters (RSI Band cloud filter, momentum confirmation, anti-double-fire, bar-close only), the 10 winrate-boosting tips, the 5 situations to skip a signal, the trade management table, and the A++ / B / C real-world setup examples.
The Pullback Signal is the heart of mrD-RSI Pullback. It is the entry trigger every other module supports — RSI Band filters it, Hidden Divergence confirms it, S/R Volume Zones anchor its SL / TP, and the Info Table provides the context check. If you only learn one thing about this study, learn this page.
A Pullback Signal does not fire at the moment RSI enters overbought / oversold. It fires only after the market has proven its momentum, pulled back to value, and confirmed continuation. The result: signals appear at retracement bottoms (LONG) or retracement tops (SHORT), not at the extremes where most traders chase.
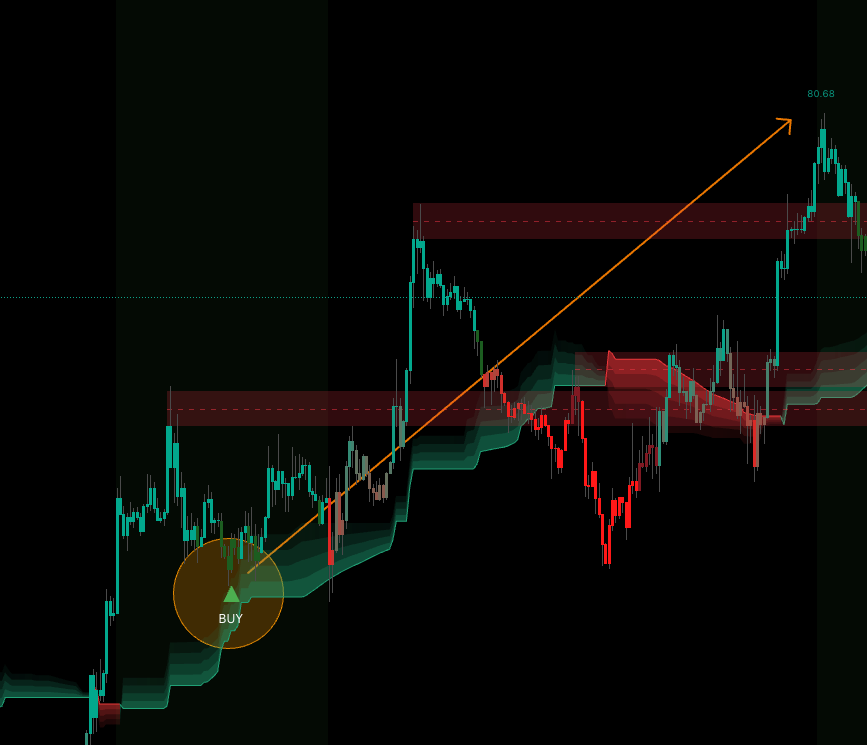 The triangles fire ONLY after the pullback completes and continuation is confirmed — not at the moment RSI enters extreme zones. That is the entire design philosophy.
1. What is a Pullback Signal?
A Pullback Signal appears when three conditions align simultaneously:
- Strong momentum has formed — RSI has touched extreme overbought / oversold within the recent dozens of bars.
- Price has pulled back to value — RSI has retraced to the "support" zone (in an uptrend) or "resistance" zone (in a downtrend).
- Continuation confirmation appears — the bar confirms momentum is resuming in the original direction.
The signal fires BELOW the bar (BUY) or ABOVE the bar (SELL). It only confirms on bar close — no mid-bar phantom signals, no repaint.
2. Why pullback instead of breakout?
| Entry style | Pros | Cons |
|---|---|---|
| Breakout (chasing top) | Early entry on trend kickoff | Heavy stop-hunt risk, weak R:R |
| Pullback (waiting) | Entry near support, R:R 2-5× | Sometimes you miss the move (late entry) |
The study is designed to trade some timing for better R:R. You will miss a few "chase-and-win" moves but you will not blow up during all the "chase-and-lose" ones.
A trade not taken = no loss. A wrong trade taken = real loss.
The indicator prioritises eliminating wrong trades over capturing every move.
3. Enable and configure Pullback Signals
Two settings groups control the entry engine.
Display group → Entry Signals Mode
| Option | Displays | Use when |
|---|---|---|
| Both | BUY and SELL | Default — trade both directions |
| BUY | BUY only | Spot crypto / long-term DCA |
| SELL | SELL only | Hedging / short-only strategy |
| None | Disable all | View RSI Band only, no signals |
Advanced signals group → Timeframe Signals Mode
This is an extremely important setting — it determines which signal type fires:
Current timeframe→ fires standard Pullback Signals on the chart's TF.5m & 15m,15m & 1h,1h & 4h… → fires Advanced Pullback with multi-TF confluence.
Full reference for the multi-TF mode: Advanced Pullback.
4. Reading signals on chart
▲ BUY (deep green) — below the bar
Meaning: RSI peaked high (OB zone), pulled back to support, now turning up → enter LONG.
Action:
- Entry — at the close of the signal bar, or market on the next bar.
- SL — below the most recent swing low (3–5 bars back).
- TP1 — R:R 1:1.
- TP2 — nearest resistance zone or R:R 1:2.
▼ SELL (deep red) — above the bar
Meaning: RSI dropped deep (OS zone), pulled back to resistance, now turning down → enter SHORT.
Action:
- Entry — at the close of the signal bar.
- SL — above the most recent swing high.
- TP1 — R:R 1:1.
- TP2 — nearest support zone or R:R 1:2.
5. Built-in filters — already on, silent
The indicator applies four filters automatically — no extra work for you. Listed here so you know why some "obvious" setups never fire.
- RSI Band cloud filter — signal only fires when price is on the right side of the cloud (BUY when cloud green, SELL when cloud red).
- Momentum confirmation requirement — the trigger bar must show a strong body or RSI rising / falling clearly. A flat doji at the level does not trigger.
- Anti-double-fire — after firing once, the indicator resets and waits for new conditions to form before allowing another same-type fire. No spam on small wiggles.
- Bar-close only — no repaint, no mid-bar phantom signals. The triangle is final the moment it appears on a closed bar.
6. Ten tips to maximise win rate
Tip 1 — Never trade against the cloud
Green cloud = BUY only. Red cloud = SELL only. The indicator already filters this, but if the cloud has changed within the last 1–2 bars (transition), skip the signal and wait for stability.
Tip 2 — Confluence with swing high / low
Enable S/R Volume Zones. A signal firing near a green Support zone + BUY direction = extremely high probability.
Tip 3 — Volume Ratio ≥ 1.0×
Check Info Table → Vol Ratio. Signal firing when Vol Ratio < 0.5× = weak market, skip. Vol Ratio ≥ 1.5× = volume confirms, enter confidently.
Tip 4 — Avoid low-liquidity hours
Forex Asian session (00:00–06:00 GMT) or crypto US-asleep hours (08:00–14:00 GMT) → low volume → poor signal quality. Trade during prime hours of that asset.
Tip 5 — Manual multi-TF check
Before entering, open one TF higher. Trading 1H? Check 4H. If 4H also has the RSI Band cloud aligned → strong confluence. Or use Advanced Pullback which does this automatically.
Tip 6 — No trades around major news
The indicator does NOT process fundamentals. NFP, FOMC, CPI within 30 minutes → close everything, stand aside.
Tip 7 — Skip signals during sideways
If the cloud flips colours every 5–10 bars → market is chopping → all signals are losers. Stay out.
Tip 8 — A cluster of signals = strong trend
If you see 3–5 signals in the same direction within 20–30 recent bars → trend is "hot" → every subsequent pullback is an opportunity.
Tip 9 — After 2 consecutive losses → take 1 hour off
Signals are bad right now — market context is not right. Do not revenge trade. Wait for the context to reset.
Tip 10 — Combo with Hidden Divergence
See Hidden Divergence. Pullback Signal + Hidden Divergence in the same direction = A++ super setup.
7. When NOT to take a signal
Five situations where the signal looks valid but the win rate collapses.
Cloud just changed colour less than 3 bars ago
Cloud not stable → 50/50 odds. Wait.
Signal fires near a strong opposing structure
E.g. BUY signal but a major resistance is just 2–3 bars overhead → poor R:R. Skip.
Volume Ratio below 0.5×
Market is asleep → price has no purpose → easy random stop-out.
Background coloring shows continuously
Strong red / green background = RSI in extreme OB / OS. Signals firing during this phase are often dangerous bottom-fishing.
Signal fires during a big gap / news spike
Bar gaps too large → SL gets jumped → uncontrolled risk. Stand aside.
8. Trade management
The same management rules cover every Pullback Signal. Apply them mechanically.
| Situation | Action |
|---|---|
| Price reaches 1R profit | Move SL to break-even, take 30–50% off. |
| Price reaches 2R profit | Trail SL behind the nearest S/R Volume zone. |
| Opposite signal fires | Close everything — do not wait. |
| RSI Band cloud flips colour | Close 50%, trail the other 50%. |
| Price stalls 10+ bars | Close 50% — liquidity drying up. |
| Major news event | Close everything — no questions. |
The 1% rule per trade
Maximum risk per trade = 1% of account.
- $10,000 account → SL must not lose more than $100.
- Calculate position size based on SL distance, not fixed dollar amount.
Full money-management reference: Winrate Tips — money management.
9. Real-world examples
The same Pullback Signal can be an A++ or a C-grade trade depending on confluence. Three examples below cover the full range.
A++ setup — super high win rate
Conditions:
- Stable green cloud ≥ 10 bars.
- ▲ BUY fires below bar.
- Volume Ratio ≥ 1.2×.
- A Support zone (green "S" box) within < 1% of price.
- Hidden Divergence (green dot) nearby.
- Higher TF cloud also green.
→ Full size, target R:R 1:3, SL outside Support Zone.
B setup — average win rate
Conditions:
- Green cloud.
- ▲ BUY fires.
- Volume Ratio ≥ 0.8×.
- No nearby S/R Zone.
- No Hidden Divergence.
→ Enter half size, target R:R 1:1.5.
C setup — skip
Conditions:
- Cloud just changed colour < 3 bars ago.
- ▲ BUY fires.
→ Skip. Do not trade.
The full setup-grading framework lives in Winrate Tips — setup classification.
Common questions
Why do I see so few signals? This is a feature, not a bug. The indicator is designed to filter aggressively. If you want more signals, switch to Current timeframe mode (standard signals). If still few, the asset may be sideways — switch asset.
Do signals repaint? No. Signals only fire on bar close (barstate.isconfirmed). You may see a preview during the live bar but the final signal locks at bar close.
Which TF can I use Pullback on? All TFs from 1m to Monthly. However 1H–4H is the sweet spot — best balance of signal quantity and quality.
How is Pullback different from Advanced Pullback? Standard Pullback uses only the chart's TF RSI. Advanced Pullback adds higher TF confluence → fewer signals but higher win rate. See Advanced Pullback.
Should I combine with other indicators? Recommended additions:
- Volume Profile / VWAP — confirm value zones.
- Funding Rate (crypto futures) — if funding extreme and opposing signal → special setup.
- Higher TF EMA200 — only trade in EMA200 bias direction → significant winrate boost. The Info Table already exposes EMA200 above / below.
Final thought
A signal is a "green light to consider", not a "must-take order". You are still the final decision-maker based on context — MTF alignment, level confluence, structural reads from mrD-Smart Ranges. The triangles are tools; you are the trader.
Where to go next
- The multi-TF upgrade for higher-quality signals: Advanced Pullback.
- The candle-coloring layer for momentum reads: Candle Coloring.
- The Hidden Divergence layer for A++ combo setups: Hidden Divergence.
- The S/R Volume Zones for SL / TP placement: S/R Volume Zones.
- The Info Table for pre-entry context check: Info Table.
- The 12 golden rules for max win rate: Winrate Tips.
- Back to the study overview: mrD-RSI Pullback.