Liquidity Concept
The Buy-Side / Sell-Side Liquidity engine inside mrD-Smart Ranges — auto-detects the swing-high and swing-low clusters where stop-loss orders are parked, draws horizontal liquidity lines, and highlights the zone in green the moment price starts sweeping. Read whether the sweep will reverse (the classic sweep-and-reverse) or continue (clean break in the prevailing trend) before you take the trade.
The Liquidity Concept module is the stops-and-sweeps layer of mrD-Smart Ranges. It identifies where retail stop-loss orders are statistically parked — above recent swing highs (where short-sellers' stops sit) and below recent swing lows (where long-traders' stops sit) — and draws those levels as horizontal liquidity lines. The moment price reaches a liquidity level the module highlights the zone in green, so you can watch the sweep happen in real time and read what comes next: a reversal back into the range, or a clean continuation of the trend.
This is the most behavioural of the four Smart-Ranges layers. It does not predict — it shows you the structural pools the market is targeting, and lets you read whether the sweep is institutional accumulation or trend continuation. Pair it with the OB and FVG layers to build the full picture.
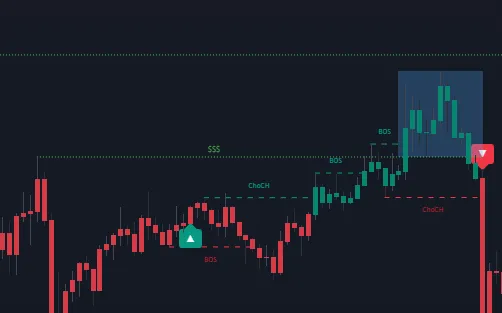 Horizontal dashed lines mark the liquidity pools — BSL above the recent swing highs, SSL below the recent swing lows. When price enters a zone the line and the zone behind it highlight green; that is the sweep starting.
The two liquidity types
The module distinguishes two complementary structural concepts:
Buy-Side Liquidity (BSL)
A Buy-Side Liquidity pool sits above the chart's recent swing highs. The intuition: traders who shorted into those highs placed their stop-losses just above the high — if price runs through that level, the resting buy-stop orders trigger, generating a wave of forced market buying. Large desks know this and frequently push price through BSL to fill their own buy orders against the liquidation flow.
Translated for the trader watching the chart:
- BSL run = price spiking through a recent swing high, triggering stops.
- The question every time: does the spike reverse (smart money was just collecting liquidity) or continue (genuine breakout)?
Sell-Side Liquidity (SSL)
A Sell-Side Liquidity pool sits below the chart's recent swing lows. Same mechanism, mirrored: longs placed their stop-losses just below the low; running through that level triggers the sell-stop orders, generating forced selling that large desks use to fill their own sell orders.
- SSL run = price spiking through a recent swing low, triggering stops.
- Same question: does the spike reverse (smart money collecting liquidity) or continue (genuine breakdown)?
The two outcomes at a sweep
Reading which of the two outcomes is happening is the trader's job. The module gives you the levels and the green highlight; you give the read. There are two characteristic patterns:
Reversal — the classic sweep-and-reverse
Most BSL / SSL touches are stop runs, not breakouts. Price spikes through the level, briefly trades on the other side of the high / low, then reverses back into the range. This is the classic Smart Money pattern: liquidity is collected, the order book is filled, the move continues in the original (or new) direction.
 Sweep-and-reverse: SSL is run, the liquidation flow gets absorbed, then price reverses and continues higher. The green highlight marks the moment the sweep happened.
The trade in this pattern is fading the sweep — buying just inside the SSL once it has been run and rejected, selling just inside the BSL once it has been run and rejected. The stop is on the other side of the swept level; the target is the opposite liquidity pool (or the nearest OB / FVG).
Continuation — the genuine break
Some BSL / SSL touches are real breakouts. Price runs the level and keeps going — the move is impulsive enough that the stop-run flow is just fuel for the continuation. This is far less common than the reversal but it does happen, especially in trending markets when liquidity is taken in the direction of the larger trend.
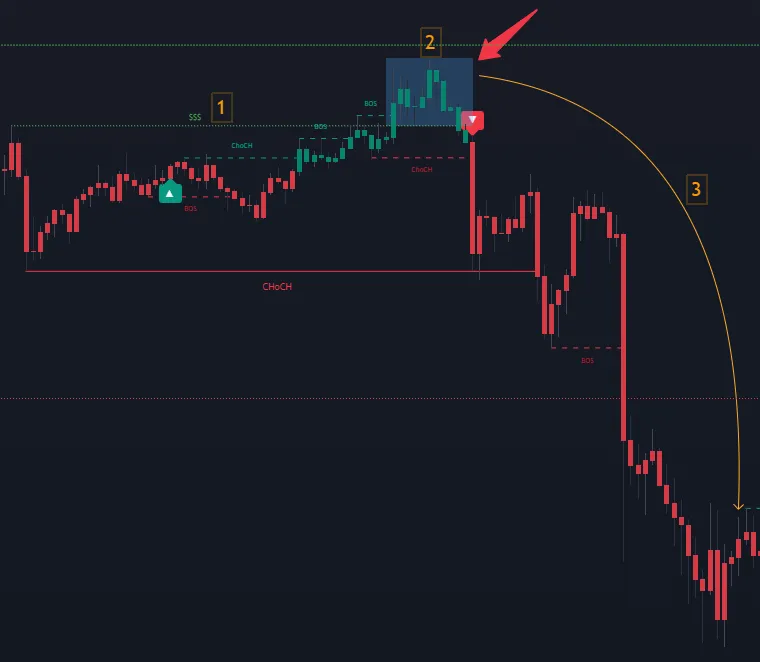
 Continuation: BSL is taken cleanly and price keeps going. No sweep-and-reverse — the level was just an intermediate target on the way to higher prices.
The trade in this pattern is buying the retest of the swept level as new support (for BSL break) or selling the retest as new resistance (for SSL break). The level that just broke flips role and becomes the next clean entry zone.
How to tell the difference in real time
The two reads can look identical for the first one or two candles after the sweep. The differentiator is the bar that closes after the sweep is complete:
- Reversal read — that bar closes back inside the original range (back below the swept BSL or back above the swept SSL). The sweep was rejected.
- Continuation read — that bar closes outside the original range and the next bar opens in the same direction. The sweep was confirmation, not a stop-run.
Pair this with the rest of the Smart-Ranges stack:
- If there is an Order Block waiting on the other side of the swept level → high probability of continuation to that OB.
- If there is an FVG that needs filling on the other side of the level → high probability of continuation to the FVG.
- If the swept level was the closest structural target and there is no other zone past it → high probability of reversal.
Settings reference
The module has only two settings:
| Setting | Default | What it controls |
|---|---|---|
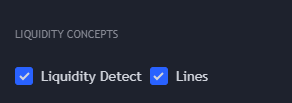
| Liquidity Detect | On | Renders the green highlight on the BSL / SSL zone the moment price enters it. This is the visual cue for "sweep starting". |
| Lines | On | Draws the horizontal liquidity lines on the chart — BSL above swing highs, SSL below swing lows. |
Both should be left ON for normal use. Turn off Lines only if your chart is already cluttered with OBs and FVGs and you want the liquidity layer to be silent until the green highlight fires.
The module does not expose a "sensitivity" slider or a "Show Last" cap. The engine prunes liquidity lines automatically as new structure forms — the on-chart lines are always the currently-relevant pools.
Trading playbook
The canonical liquidity trade in this study has two flavours, mapped to the two outcomes above.
Sweep-and-reverse — fade the liquidity grab
- Identify a pending liquidity pool. Find a BSL line above price (or SSL line below) within reasonable distance — say within 1–2× the average ATR of the chart TF.
- Wait for price to run the level. The green highlight appears the moment price enters the zone.
- Wait for the rejection close. The first candle that closes back inside the original range is your trigger. Do not pre-empt.
- Confirm with the OB / FVG layer. The trade is much stronger if the rejection happens at a same-direction OB or FVG just inside the swept level. The OB / FVG provides the structural anchor for the reversal.
- Entry on the rejection close, stop on the far side of the swept level, target the opposite liquidity pool or the nearest unfilled FVG.
Continuation — buy the retest of the swept level
- Identify the sweep. The green highlight appears, the level is broken, and the bar closes outside the range — this is the continuation signature.
- Wait for the retest. Price will often come back to the swept level (now flipped support / resistance) within a few candles.
- Confirm with the OB Break layer. The most reliable continuation retests align with an Order Block Break (the OB that contained the swept level has now flipped role). See Order Blocks Break.
- Entry on the retest, stop just past the swept level, target the next liquidity pool in the direction of the move.
Tips for cleaner reads
- Treat unbroken liquidity as a magnet. If you can see a BSL line clearly above price with no significant zone between price and the line, expect price to gravitate to it. The market does not leave large stops untaken for long.
- The first liquidity sweep after a strong impulse is usually a reversal. The market spent its momentum on the impulse; the sweep is the stop-collection before the pullback.
- The N-th liquidity sweep in the same direction is more likely to be a continuation. When a trend has already taken several liquidity pools in the same direction, the trend has structural momentum behind it.
- Liquidity sweeps inside a clean range are reversals; liquidity sweeps at the edge of an established trend are continuations. This is the single most useful heuristic for choosing which playbook to apply.
Common mistakes
- Trading the sweep direction (buying the breakout above BSL or selling the breakdown below SSL). That is the retail read — running into the trap the sweep is designed to set. The correct read is to wait for the close and then decide.
- Fading every sweep without confirmation. Sweep-and-reverse only works when the post-sweep close is back inside the range and there is a structural anchor (OB or FVG) supporting the reversal. Without those, you are just guessing.
- Ignoring the liquidity layer when reading OB retests. An OB retest that happens to coincide with a liquidity sweep just inside the zone is the highest-quality OB setup the study produces. Many traders miss this confluence by leaving
Linesoff. - Treating very old, deep liquidity pools as still valid. The engine prunes stale pools automatically, but if you see a BSL line that has been sitting unfilled for a hundred bars, it is the next target — not a far-future curiosity.
Common questions
Why does the green highlight sometimes fire without a clean line touch? The engine looks at whether price is inside the liquidity zone (a small band around the line) rather than only the exact line price. A wick that nudges into the zone is enough to start the highlight.
Are BSL and SSL levels non-repainting? Yes — they are confirmed once the swing high / low that defines them completes. The level itself does not move once printed; the green highlight is a real-time render of whether price is currently sweeping it.
Why are there no liquidity lines visible on the current chart? Either (a) Lines is OFF, or (b) the current zoom level is too tight and the relevant pools are off-screen. Zoom out — most charts have at least one BSL above and one SSL below.
Should I trade liquidity sweeps standalone? Possible but not recommended. The sweep-and-reverse vs continuation read is hard without an OB / FVG structural anchor. Use the Liquidity layer to time a trade idea that the OB / FVG layer already gave you, rather than as the sole trigger.
Where to go next
- The Order Block layer the liquidity sweep usually pairs with: Order Blocks.
- The FVG layer that defines the reversal target after a sweep: Imbalance Concept.
- Wire the related OB / FVG signals into push / webhook delivery: Alerts.
- Back to the study overview: mrD-Smart Ranges.